First we have to create
table with the table name Student with the following fields in which we
are going to insert records.
Insert Data
Into The Table for execution of
queries open the new query window from the Microsoft Sql Server Management
Studio.

Column
Name
|
Data
Type
|
Length
|
Std_Name
|
Varchar
|
50
|
Address
|
Varchar
|
50
|
City
|
Varchar
|
50
|
Age
|
Numeric
|
8
|
DOB
|
DateTime
|
8
|
Class
|
Varchar
|
10
|
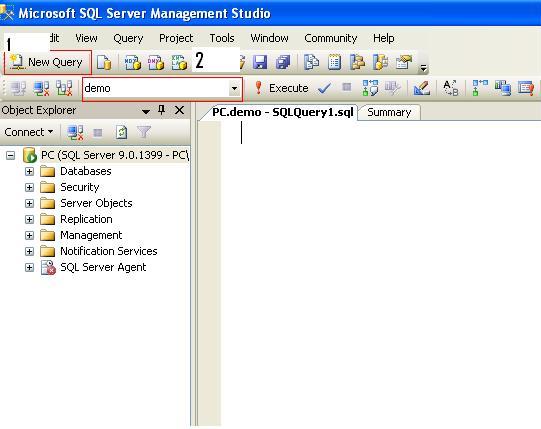
Insert Data
Into The Table for execution of
queries open the new query window from the Microsoft Sql Server Management
Studio.
Select
SQL Server from the drop down combo if you are using the client else in case of
server enter (local) like above. Select window authentication or SQL Server
authentication according to your system installation and click on OK. Query window will appear as you click on New Query marked as first red. Select your database from the combo displaying at
the toolbar above on the screen. Now write down the following query in the
displaying window.
·
The
syntax for insertion is –
Insert into table name
values (‘String value’, numeric value)
Use
single quotes for passing the character value and numeric value will be passed
with out quotes. Date time will be passed with single quotes using “MM/DD/YYYY”
format.
·
For
passing the data in all fields of the above table
Insert into student values
(‘Ram’,’Saheed Nagar’, ‘AGRA’, 21, ‘12/25/1987’, ‘10’)
·
For
passing the data in specified fields of the above table
Insert
into student (std_name, Address, city, age) values (‘Ram’,’Saheed Nagar’,
‘AGRA’, 21)
·
For
passing the complete table in another table with same data structure.
Insert into second Table
Name select * from first Table Name
·
For
passing the complete table in another table with different data structure.
Insert into second Table Name select
field1, field2, field3 from first Table Name
·
INSERT
with DEFAULT VALUES
INSERT student DEFAULT VALUES
INSERT employee VALUES ('KLT91469F', 'Katrina', 'L', 'Thompson', DEFAULT, DEFAULT, DEFAULT, '01/14/95')
When inserting rows, these rules apply:
· Inserting an empty string (' ') into a varchar or text column inserts a single space. All char columns are right-padded to the defined length. All trailing spaces are removed from data inserted into varchar columns, except in strings that contain only spaces. These strings are truncated to a single space.
· If an INSERT statement violates a constraint, default, or rule, or if it is the wrong datatype, the statement fails and SQL Server displays an error message. Constraints are defined with either the CREATE TABLE or ALTER TABLE statement. Defaults are created with the CREATE DEFAULT statement and rules are created with the CREATE RULE statement.
· Inserting a null value into a text or image column does not create a valid text pointer, nor does it pre-allocate a 2K text page. For details on inserting text and image data, see the text and image Manipulation topic.
· An INSERT statement must follow the rules for a batch. For details, see the Batches topic.
When you specify values for only some of the columns in the column list, one of three things can happen to the columns that have no values:
· A default value is entered if the column has a DEFAULT constraint, if a default is bound to the column, or a default is bound to the underlying user-defined datatype.
· NULL is entered if the column allows NULLs and no default value exists for the column.
· An error message is displayed and the row is rejected if the column is defined as NOT NULL and no default exists.
Comments
Post a Comment